A Simple Java Log Writer Class for debugging a multi-thread execution

I’m working on this Machine Learning project these days with a bunch of other guys and we came up with an asynchronous concurrent architecture which also used this handy event library LinkSet by Lukasz Bownik. However when the implementation came together in the end it was really hard debug the execution with the normal tools available in IDE’s since its difficult keep track of all the threads in different stages of execution. I wrote what turned out to be quite a simple class to solve this problem the code of which is given below. The WriteLog method enforces an order to writing a log entries detailing the positions in execution of threads based on the order of calling the method. While very simple it did the job as I debugged the program quite easily after that. Note however that its only for debugging and that it should not be used in an actual execution that doesn’t need similar synchronizing since it creates a performance bottleneck 🙂


import java.io.BufferedWriter;
import java.io.FileWriter;
import java.io.IOException;

public class LogWriter{

 private static final String LOG_FILE = System.getProperty("user.dir")+"/log.txt";

 private static LogWriter writer=new LogWriter();

 public synchronized void WriteLog(String entry){

    BufferedWriter bw=null;

    try {

        bw =new BufferedWriter(new FileWriter(LOG_FILE,true));
        bw.append(entry);
        bw.newLine();

    } catch (IOException e) {

        e.printStackTrace();

    }finally{

      try {

              bw.close();

      } catch (IOException e) {

               e.printStackTrace();

     }

  }

 }

public static LogWriter getInstance(){

     return writer;

 }

}

Using Popup Windows in ASP.NET

Introduction

In the last couple of weeks I’ve been working on ASP.NET web application where there was a need to pop up web pages of different forms where the logical flow and the data flows from the Parent page to the Popup varied.  Based on that experience this post will show 3 different ways of popping up an ASP page from another fitting different requirements

The VS 2010 project in which I tested the code can be downloaded from here(if you’ve got an older VS version you can import just  the pages or copy and paste the content in to your own pages  )

Note: I will be using to web forms; Parent.aspx and Child.aspx and be popping up the Child from the parent 🙂

Approach 1: Using a JavaScript function in ASP page statically attached to a Control

This is likely the easiest approach is done completely from the client side. Here’s how it was implemented for the Parent and Child

JavaScript function  in Parent.aspx

 function popup() {//function to popup a instance of the Child.aspx on clicking Btn1
            var obj = document.getElementById("Btn1");// get a reference to Btn1
            var url = 'Child.aspx?value=' + obj.getAttribute('value'); // create the url including the text of Btn1 in the query string
            window.open(url,'ShowPopup', 'height=500,width=400px,resizable=yes');//popup the Child page
        }

This function would come within the header tag within <script type=”text/javascript”></script> tags.

The following code shows how the function is attached to the client side click event of the Button Btn1

<body>
 <form id="form1" runat="server">
  <div>
   <asp:Button ID="Btn1" runat="server" Text="javascript in aspx" OnClientClick="popup()"/>
  </div>
 </form>
</body>

You will notice that I’ve added the text value of Btn1 to the query String  that is passed to the window.open in the popup function.  We can write a small piece of code  within the page _load  method of the Child page to extract this value and display in a label.

Label in the Child page

<body>
 <form id="form1" runat="server">
  <div>
  <asp:Label ID="lblValue" runat="server" Text="Label"></asp:Label>
  </div>
 </form>
</body>

Page_load Method of the Child page

 protected void Page_Load(object sender, EventArgs e)
 {
       String value = Request.QueryString["value"];
       lblValue.Text = value;
 }

Once this code is added by clicking the button in the Parent page you will popup an instance of the Child page containing the text in the button that was clicked. The main problem with this method is that since its done completely on the client side we will have to use not so elegant work arounds to access the server side variables if we need them. Ex: Saving the value of a server side variable to a hidden input on the aspx page. Also if you want the popup to appear as a part of a sequence of  operations including server side operations this may not be the best way for you.

Approach 2: Attaching a JavaScript code block  to a Control from the  Server side (Code behind)

Instead of statically attaching a JavaScript function to a button click event  on the aspx page we have the option of doing it dynamically from the server end. I’v added another button to the Parent page to demonstrate this

<body>
<form id="form1" runat="server">
<div>
<asp:Button ID="Btn1" runat="server" Text="javascript in aspx" OnClientClick="popup()"/>
<asp:Button ID="Btn2" runat="server" Text="attach popup to click from code behind" />
</div>
 </form>
</body>

The following code is added to the page_load method to attach the JavaScript code block that will pop up the Child page and add the text in the new button to the query string

page_load method of the Parent page


protected void Page_Load(object sender, EventArgs e)
{
Btn2.Attributes.Add("onClick", "javascript:window.open('Child.aspx?value=" + Btn2.Text + "', 'ShowPopup', 'height=500,width=400px,resizable=yes')");//attach the pop up script to Btn2 with its text in the query string
}

No change is needed in the  Child page since we are passing the new value to the same query parameter. Once again when you click the new button you will get a new pop up instance of the Child page with the text of that button.

Pros and Cons of the approach

Pros

  • unlike in approach one you can now easily access the server side variables and pass them to the server side variables. Note: try this out by passing the value of a variable in the server side instead of the text of the button I’ve added to the query string
  • It allows you to dynamically add and remove JavaScript code blocks that can change popped up page, the variable passed as well as the appearance of the popup

Cons

  • You have to  attach the  popup code before the Control fires the relevant event.  If  you put the code attaching the popup inside the server side method for the click event the first time you click the button the pop up will not appear because thats when the popup code got attached.
  • This approach also doesn’t allow you to pop up a window as a part of a sequence of operations on the server side. Consider a situation where on clicking Btn2 you need to perform some operations to get the value you are passing in the query string. If you’ve already attached the popup code you can’t synchronize the client side script with the server side operation so the correct value may not get passed. If you try to attach the popup code inside the same method you run in to the problem above 🙂

Approach 3: Using the page script manager to run the JavaScript Code block for popping up the page

This approach likely offers the most flexibility of the three options discussed.  In the test project I’ve simply added a third button to try out this option

<body>
<form id="form1" runat="server">
<div>
<asp:Button ID="Btn1" runat="server" Text="javascript in aspx" OnClientClick="popup()"/>
<asp:Button ID="Btn2" runat="server" Text="attach popup to click from code behind" />
<asp:Button ID="Btn3" runat="server" Text="run pop up from code behind" OnClick="Btn3_Clicked" />
</div>
</form>
</body>

In this approach you can write the  pop up code at the exact point in the logical sequence of the code in the relevant  method . In my case I am just popping up the page on clicking the relevant button 🙂

The  Event Handler method for the Click event of Btn3

protected void Btn3_Clicked(object sender, EventArgs e)
{
    // popup the Child page by running the pop up script using the page Script Manager and adding Btn3 text to the query string
    ScriptManager.RegisterClientScriptBlock(this, this.GetType(), "test", "window.open('Child.aspx?value=" + Btn3.Text + "','1','height=500,width=400px');", true);
}

Instead of sending the text in the button  in the query string try sending a value of a variable you changed  within the above method and you’ll see the updated value is passed.

Note: While I have not yet found any limitations in this approach there will be some 🙂 .  I appreciate any input on this. Also when I carried out testing on Google Chrome this was the only approach in which the pop up got blocked by default.

For those of you who wanting a quick fix you can just modify the code where it changes and leave the rest as it  is in your implementations. For those interested in a little experimenting  and want to understand the method usages etc the following links will prove useful

JavaScript window.open method

ScriptManager.RegisterClientScriptBlock -The MSDN reference

Enjoy!

Extracting data from Excel files with Headers

Introduction

One of the first problems that I faced when I started developing SQL Server ETL packages is that most of the time customer organizations generated Excel files that had some of header at the top. The relevant column headers and the actual data came afterwards. Since these headers  had to be treated  differently from the actual data (or in my case not treated at all 🙂 ). I had to come up with a way to distinguish between the two.

Based on a suggestion by a senior developer I was able to come up with a relatively simple solution that is demonstrated in this post.

Note: I would be using an already developed ETL and modifying it to handle the above scenario.

Step 1:


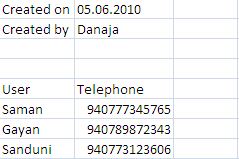
Excel sheet with the headers

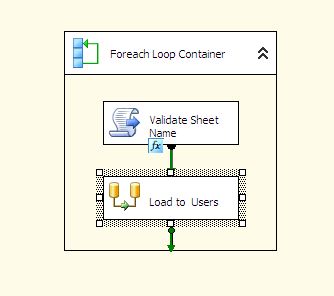
The control flow design of the original ETL

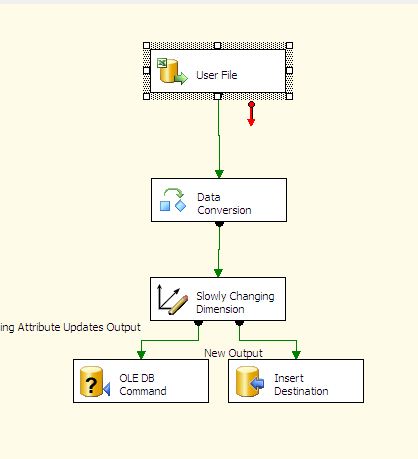
Data flow design of the Original ETL

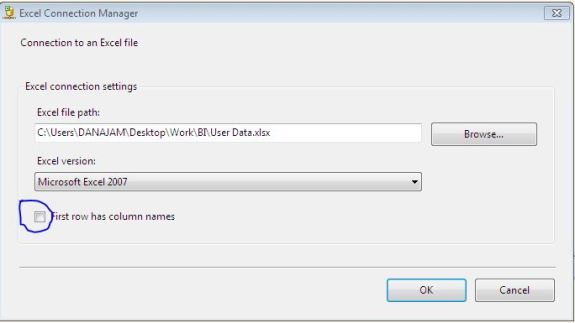
The original Excel file had the column headers in the first row of each sheet which allowed the use of the “First row contains column headers” option in the Excel connection manager that indicated the fields in the data stream by the column header and in general made things easy. In this case we need to disable this option.

de-selecting the first row has column headers option

Step 2:

The logic of the solution is to simply add an additional column to the data stream from the Excel File  that contains the row number which can be used as the basis for splitting the stream in to the data rows and the header information.

Now we move to the data-flow design where rest of the modification will take place

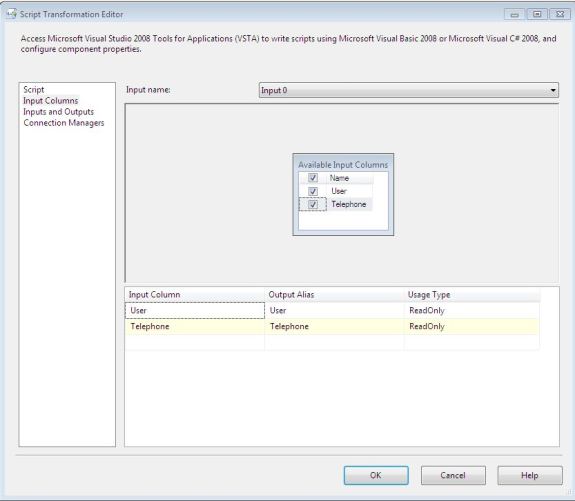
First in the edit wizard for the Excel Source we will have name the columns that we are extracting from the Excel File since due to the “first row contains column headers” option being disable the the columns containing data in the excel file will simply be displayed by the column number. While this standard name can be used for the entire process its better to rename them original column names from the Excel file for ease of  reference. Next detach the Excel source component and the data conversion component and drag and drop a script component from the tool box connect it to the Excel Source. The script component needs to be configured to accept the input from the Excel source as well as to specify the output columns using the edit option (on right click)

accepting the input fields from the Excel Source

configuring the output of the script component

There are two important facts to note in configuring the output of the script component.

1. The output variables must have the same datatype as the corresponding input variables if they exist.(Conversion of the datatype within the script is usually not recommended)

2. Note the addition of an extra  Row Count column to contain an integer value in the output. This column will be populated from within the script of the script component.

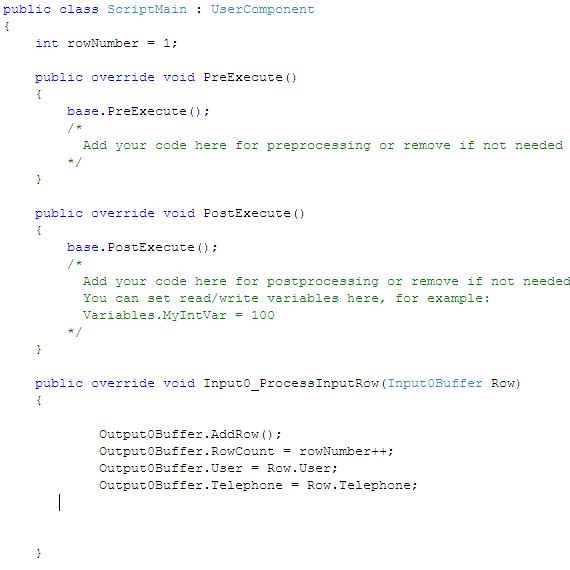
The following code within the script will both populate the row count column and transfer the streams from the input fields to the corresponding output fields.

script to populate the output of the script component

the Input0_ProcessInputRow method executes once for each row and as such can be used for us to take a count of the number of rows passing through the  script component.  In this case we are simply adding a an output row  for each input row  and transferring the input to the output and setting the incrementing row count to its own output column which we created.

After building the code we can move back to the data flow design and go for the next stage.

Step 3:

Now that we have a field that contains the row number in the data stream we can use it to split the data with a conditional splitter component.

Drag and drop one in to the data flow design area and connect it to the script component. In the configuration screen of the conditional splitter we add the following logic.

splitting the data stream in to data rows and headers

Since we know that the data rows start from the sixth row by looking at the Excel sheet. Thus rows having a row number greater or equal to 6 are extracted as Data rows and the rest as header rows.

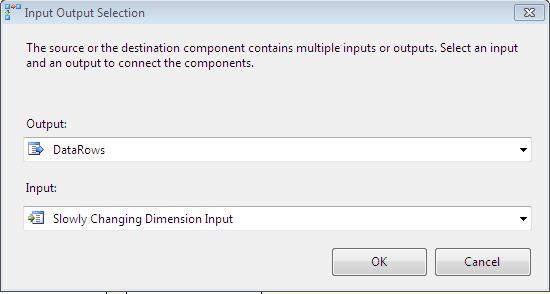
Now connect the Conditional splitter component to the data conversion component at which point we have to select the Data Rows as the relevant data stream to be transfered to the conversion component.

Selecting the Data Row stream as the input to the conversion column

The package has now been modified to  extract and separate the data rows from the Excel file taking in to regard that header columns.  The logic of the solution can be modified  for any package (even for ones with multiple data and header areas) by simply considering the threshold row values.

Note :If you tried out the solution by starting completely new project you most likely won’t have any problem. If you  modified an existing package you may need to resynchronize the components below the  conditional splitter like I had to 🙂

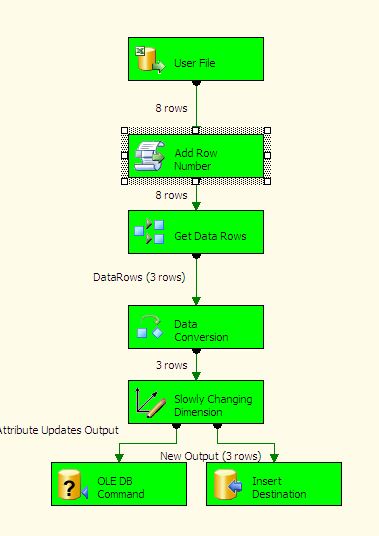
data flow design of the successfully executed package

Notice how the data gets split after the Conditional Splitter component.

Enjoy!

Modifying a AJAX Calender control to operate with only Years

Recently I was working on improving the UI of a web form a colleague had developed and one of the requirements was to have a Calender control to select the year for which the data in the form should be filtered. I knew that this had to be done by using the Calendar extender control offered by the AJAX Control Toolkit  but just didn’t know how.

The problem was that the Calender extender by default operates at the days level. This means that normally when the control is shown it’ll be showing the days in the months and even if this could be changed to show just the years selecting the year would just drill down to month and selecting a month to days and the selection would be mad at that level.

After a couple of hours of looking around in the net I came across this great post in Agha Usman Ahmed’s Blog which had what I wanted exactly but at the month level. With very little modification I was able to adopt it to my requirement.

The solution to the problem was to switch the mode of the calendar to year using an available method and the attach a click event to each item. This way when a year is selected it fires a click event and the drill down to the month doesn’t happen.

The following is the code I’ve used with a brief explanation

<form id="form1" runat="server">
    <div>
     <asp:TextBox ID="YearBox" runat="server"></asp:TextBox>
     <asp:CalendarExtender ID="TextBox1_CalendarExtender" runat="server" OnClientHidden="onCalendarHidden"
        OnClientShown="onCalendarShown" BehaviorID="calendar1" Enabled="True" TargetControlID="YearBox" Format="yyyy">
      </asp:CalendarExtender>
      <asp:ToolkitScriptManager ID="ToolkitScriptManager1" runat="server">
      </asp:ToolkitScriptManager>
     </div>
 </form>

As seen by the above source code I used an AJAX calendar extender control when given a target control such as a text box would render a calendar control when that control is selected. (If you don’t have the AJAX control toolkit installed click here to get  the .dll).

The format option has been set to “yyyy” so that when a year is selected this would set the text in the target control to the year with that format.

A behavior ID has been given to the calendar extender so that its client end behavior can be easily accessed by client side code.

The client side code in this case is three cool JavaScript methods  that together will attach/detach  click events to the year items of the calendar achieving our requirement.

The onCalendarShown method shown below adds a click event to each year item while its partner onCalendarHidden detaches the click events once the calendar is hidden


function onCalendarShown() {

  var cal = $find("calendar1");
  //Setting the default mode to year
  cal._switchMode("years", true);

 //Iterate every year Item and attach click event to it
  if (cal._yearsBody) {
   for (var i = 0; i < cal._yearsBody.rows.length; i++) {
    var row = cal._yearsBody.rows[i];
     for (var j = 0; j < row.cells.length; j++) {
      Sys.UI.DomEvent.addHandler(row.cells[j].firstChild, "click", call);
     }
   }
 }
}


function onCalendarHidden() {
  var cal = $find("calendar1");
  //Iterate every month Item and remove click event from it
  if (cal._yearsBody) {
   for (var i = 0; i < cal._yearsBody.rows.length; i++) {
    var row = cal._yearsBody.rows[i];
    for (var j = 0; j < row.cells.length; j++) {
     Sys.UI.DomEvent.removeHandler(row.cells[j].firstChild, "click", call);
    }
  }
 }
}

Both these methods call a third method ‘call’ which takes the selected year and raises the date selection changed event which will get the selected date set to the text box


function call(eventElement) {
 var target = eventElement.target;
 switch (target.mode) {
  case "year":
   var cal = $find("calendar1");
   cal._visibleDate = target.date;
   cal.set_selectedDate(target.date);
   cal._switchMonth(target.date);
   cal._blur.post(true);
   cal.raiseDateSelectionChanged();
   break;
 }
}

try it out and see how it works. for a preview of the original version check out Agha Usman Ahmed’s Blog

Enjoy 🙂

Using Lookups and Handling Errors in SSIS

Introduction

In the previous posts on Microsoft SQL server I’ve shown how to create a basic SSIS package to transfer data from an Excel file to a data base, iterate through multiple sheets in an Excel file, using XML configuration files and expression etc. In this post I’ll try to give a basic understanding of how to use  Lookup Transformations to extract data required to be entered in to a data table from a related table using data common to both tables. I will also be also be going in to detail about difficulties faced when handling Lookup no match scenarios in SSIS due to certain design  constraints and a work around that can be used.

In this post I’ll be using two SQL server database tables. One is the  User table I’ve used in all my previous posts and the other is a new Logins table. The Logins table contains the passwords and usernames of the users in the User table. Thus the Login table refers to the relevant user by the user id mentioned in the User file. The user id is included in the  Logins  table as a foreign key referring to the User  table. I created the Logins table  using  the following query.

Query to create the logins table

Also I’ve created  a Excel file containing the three columns User, Username and Password with 3 entries in two sheets.
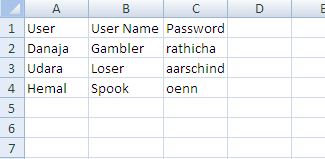
sample input in Logins File

Step 1:

The first few steps of creating  a SSIS package that can iterate through the Logins Excel file can be done based on the following post. Once done the created package will look something like this.

the Control Flow Design after step 1

The data flow task  will contain will contain an Excel source component that uses the iterating sheet variable and a data conversion component to convert data in to a type compatible with the database table data types in sequence.

Step 2:

Now move to the data flow design area and drag and drop a look up component and connect the data conversion component to it.

Data flow design after adding a Look up component

We’ll use this component to match the names from the User column in our Logins Excel file to the Name field in the Users data base table and extract the id which will be stored in the userid field of the Logins table.

Now right click the Look up component and select Edit.  Under the general settings you should select  the “Redirect rows to no match output” so that you can separately deal with data rows from the Logins table that have no corresponding entries in the Users table. By default this is set to  fail the component when there are no match rows.
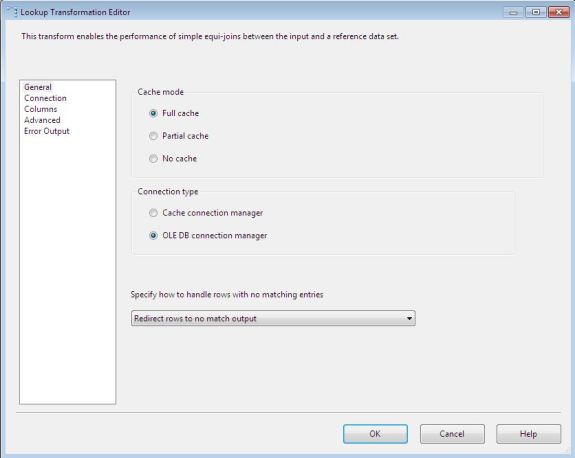
General settings of the Look up component

Next from the connection settings we need to set the database and table we’ll be connecting to in performing the look up which in this case is the Users table.
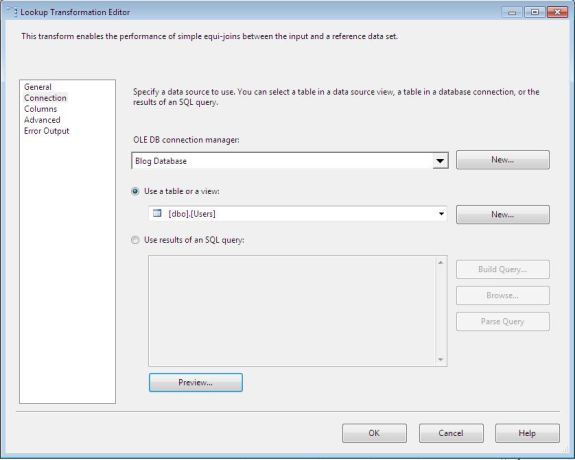
Setting the look up table

You can test whether the the connection is successful by previewing the contents of the Users table by using the preview button.

Note: you can perform  lookups on the result sets of custom SQL queries as well. The query can be inserted area seen to be inactive in the above image. However during the development carried out thus far during my  internship it has been considered good practice to write the actual query as a stored procedure and to call the SP from the lookup component.

Next in the column settings we can provide the field that need to be matched from the Excel file and the Users table and also specify the field to be extracted and added to the data flow from the table on matching. As you can see from the image below the converted user field from the Excel file has been matched with the name field in the User table and the id field is added to the data flow.

Performing the Look up

Step 3:

Once the look up component is properly set up drag and drop a slowly changing dimension component from transformations and connect the Look up component to id. In the settings  give the Logins table as the destination table and match the columns from the data flow to the relevant fields in the table.Also set the id field to be a business key, the username field as a fixed attribute and the password field as a changing attribute. If you are new to the slowly changing dimension component look in my post on creating a basic SSIS package.

At the end of this step the data flow design of the package will look something like this.

Data flow design with a slowly changing dimension added

Now the package can be run and given that I added entries in Login Excel file that match already available entries in the Users table there won’t be any errors and the new entries will be entered in to the Login table.

But what if there was a entry in the file that had no corresponding entry in the Users table?. Then that entry would have been directed to the no match output of the Look up component as we specified. As that output is not yet utilized nothing will be done about no match rows.

As I have experienced in the last few months developing ETLs it’s normal practice do dump these rows in to a text file and insert a record in to a error log. Lets try doing the  first part.

Step 4:

Drag and drop a flat file destination from the tool box in to the design flow area. Drag and drop the green arrow on the Look up component on to the flat file destination component. From the pop up options on which data stream to be transfered select the “No match rows”. This would send any entries that have no matching User table entries to the text file we are going to create.

Next we can configure the flat file destination as follows. In the edit screen create a new connection manager by clicking new. For the moment give the location of any text file in your machine as the path in the connection manager and set the other properties as shown below by the images.

Configuring the flat file destination 1

Configuring the flat file destination 2

Now back at the flat file destination edit screen move to the column section and set the order  in which the fields from the data flow will appear in the text file.

Configuring the flat file destination 3

You can give the actual path of the file that needs to be created as an expression to the connectionString property of the flat file connection manager that will be now created by creating a package variable that contains the path.The flat file destination has now been configured and the package can be run again . Note: You should remove the entries inserted in to the database by previous runs of the package before execution.

It is here that we come across the first the first problem. Notice the circled area in the image below.

post execution view of the data flow

I have executed the package with the same set of data as before which doesn’t have any no match rows. This means that there would be no rows in the no match output of the Lookup User component. I originally expected that without input the flat file destination component would simply not execute. But instead it did and just created an empty file. Imagine A set of ETL packages having multiple Lookups each dumping no match rows in to text files. Even if there are no no match rows using the above approach these ETL’s would generate dozens of empty files.

So lets take a misguided swipe at the problem and see how I came to the next larger issue.

Step 5:

Create a integer variable “ErrorCount” with the scope set to the package(Note I tried this with the scope set to just the Data flow and the result was identical). Now drag and drop  a  RowCount component on to the design area and connect it the Look up component  after disconnecting the lookup from the flat file destination. Move to the edit screen of the component and provide the Error Count variable we created as the variable to store the number of rows of no match rows.
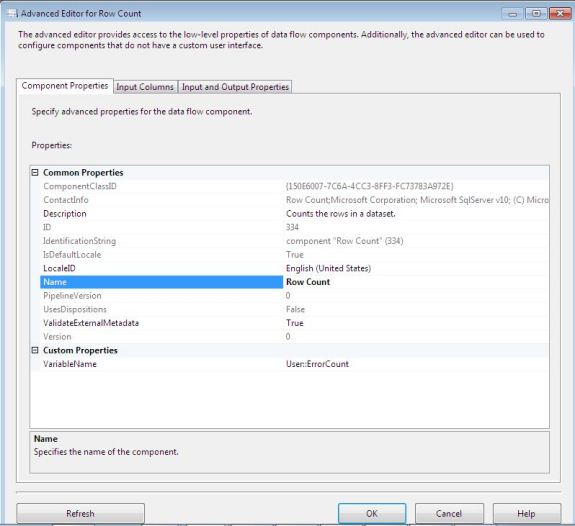
Capturing the no match row count

Then add a Conditional split component from the tool box and connect the row count component to it. In the edit screen we can give a condition which splits the data flow based on whether there are actually any no match data rows or not. At least thats the idea 😉

This can be done as shown in the image below.

Splitting the data flow based on no match rows

Now the Conditional split component can be connected to the flat file destination and the package can be executed. The expectation here is that the adjustment will result in the flat file destination component being executed only when there are actually some no match rows.

However the flat file destination component still executes even with this approach. This is because at the data flow all components will be executed based on the logical procession. If you want to control the execution that has to be done at the control flow level.

Also we can’t use a script component to to simply check the condition using C# or VB.NET and create the error file or not using .NET methods because the variable Error Count will not actually have the value of rows set at the time we check it.

This is due to the fact that a change in the value of a package variable of any scope within a data flow task will actually be reflected in that variable only after the flow exits that components. In other word s a change in a package variable within a data flow task can’t be used within the same task.

Step 6:

So those are the problems and this step shows my solution to it.

Remove the row count and conditional split components we added in step 5 and instead add a script component.Connect the component to the lookup User component and provide the ErrorCount as a

read and write variable to the script component. In the script editor of the component add the following  code.

Capturing the total number of no match rows

This code simply creates  a local integer variable which increments for each no match row during a single execution of the script component and in the post execute method the total per execution is added to the ErrorCount variable. The reason += is used in setting the Error count is because in multiple Excel sheet scenarios if sheets with no match rows are followed  by ones without the use of equal sing only will may give zero as the error count which would be incorrect.

Now connect this component to the flat file destination. The text file is still going to be created whether or not there are no match rows and this will be handled in the control flow using the value of the ErrorCount variable.

Step 7:

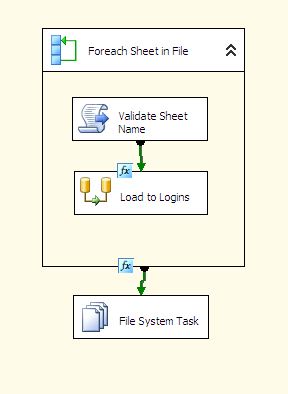
Now move to back to the control flow and drag and drop a File System Task on to the design area and connect the Foreach loop to it. Select and right click the connection in between the file system task and add the a flow condition as shown.

Setting a control flow condition to delete empty error files

Now select the File System task and edit it as follows to delete the error file that is created within the data flow task.

Setting up the file system task to delete the error file

Because of the condition applied to the input connection of the file system task the error file will now be removed only if its empty. So the net result is that there will be an error file after  execution only if there were no match rows.

The control flow design of the completed package is seen below.
Control Flow of the Completed package